
CONTACT US
21000 Frontage Rd, Suite 10
Belgrade, MT 59714
Phone 406-388-3458

Pricing & Info
FLOOR PLANS TO 1,000
FLOOR PLANS 1,000 to 1,500
FLOOR PLANS 1,500 to 2,500
FLOOR PLANS 2,500 + sq ft
LOG GARAGE PLANS
RANCHES To 1000
RANCHES Over 1000
“Almost” Ranch Plans
Other Home Design Options
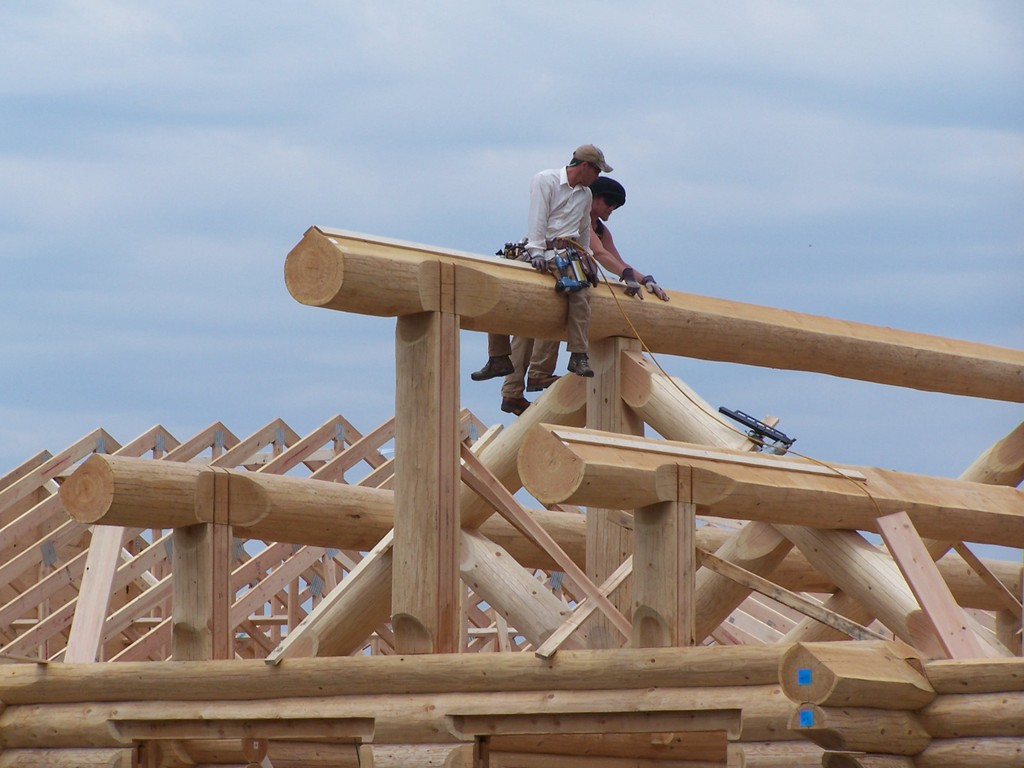
Day Four ~ Roof Framing
As we begin the fourth day of our log assembly the roof framing for the great room and the ends of the gable trusses are the next item. With a log home it is important to get the roofing in place as quickly as possible to protect the home.
If you notice between the ridge beam and purloins on the great room of the cabin (the center section) the 2×12 rafters have been laid into place. Also on the left side of the photo you can see the gable truss (the last truss) has been framed out to meet the final roof line. The sheathing is beginning to be set on the right side of the great room roof.

Our next photo was taken from the rear of the log home. We can see the gable truss on the end of the left wing has also been framed out. Notice how far the overhangs of the roof hang. All of the eves are at least 32″ deep. The ends of the great room extend about 48″. This is every important for protecting the logs from weather and direct sunlight. We have also noticed that this back cement patio is in the shade most of the day with the overhang above.

Our next photo is taken just a little further around the house. The garage trusses are in place, to the right of the photo, but the other framing has not been done yet.

The next photo shows a builder’s secret. If you look at the top of the log wall (below) you will see a 1×4 board running along the top of the wall. Then the trusses are attached through this board. This is called a spacer board. It creates a channel for the 1×6 tongue and grooves for the ceilings of the home to be slid into. Round logs can be difficult to work around with the finish carpentry if features like this are not built into the home. Without the spacer each piece of tongue and groove would have to be custom scribed around the contours of the top wall log. Instead our little spacer board allows for a much cleaner finished look for the tongue and groove and it also makes installation of the t&g faster. The spacer board is identical to the one we used on the top of the ridge beam and purloins on the great room. One other feature of the log home I would like to highlight is this is an interior log wall.
![]()
In this last photo we see the master bathroom wall. Between these two windows the wall has been recessed and notched vertically. The vertical channels are for the interior framed walls to slide into. The slabbed area between the wall notches is for the 5 foot shower to sit into. Instead of loosing space against a round log wall, the logs have been flattened, or slabbed, to create an even surface for the shower to sit against.

While the log walls stacking goes very quickly, things like framing the roof are more time consuming. It may seem that not as much is being accomplished each day, but this is not the case. Instead it is a different collection of work being completed on this handcrafted log home.